
Automatically include new pages and notebooks
Outcome: New pages or notebooks you want can be selected for sync automatically, while older unchecked content and your exceptions stay under your control.
Automatic inclusion is available from ReMarkSync v0.4.0. Selection decides what may sync now; Auto decides which new items should become selected later. An Auto included entry records that selection, not successful delivery to OneNote.
Before you begin
Section titled “Before you begin”- Finish connecting reMarkable and OneNote, and choose a destination.
- Keep your computer awake and both ReMarkSync and the official reMarkable desktop app running. Let the desktop app download your latest content first. OneNote itself does not need to be open.
- Open Library and wait for it to finish refreshing before changing a setting.
- If you are upgrading, read Opt in after upgrading: your existing selections are preserved, and the upgrade does not turn Auto on for you.
Auto follows the same account, subscription, local-file, and sync checks as manually selected content. It does not bypass a waiting state or a recovery check.
Choose the right scope
Section titled “Choose the right scope”| Scope | Selecting its checkbox | Turning Auto On from its More menu |
|---|---|---|
| Notebook | Selects its current eligible pages and turns Auto on for future pages. | Includes pages added from now on. Existing unchecked pages stay unchecked. |
| Folder | Selects currently available eligible items. The checkbox alone does not enable Auto. | Includes new notebooks in this folder and its subfolders, plus future pages in already selected notebooks. Existing unchecked notebooks and pages stay unchecked. |
| All notes | Selects currently available eligible items across the Library. The checkbox alone does not enable Auto. | Includes new notebooks across the Library and future pages in already selected notebooks, subject to more specific settings and exclusions. |
| Individual page or PDF | Selects eligible content manually. | No Auto choice. A PDF’s Document options (···) menu has no automatic inclusion setting. PDFs remain manual, including their newly annotated pages. |
Include future pages in a notebook
Section titled “Include future pages in a notebook”- In Library, find the notebook. Select its checkbox if you want its current eligible pages and future pages to sync.
- Open that row’s ··· menu. It opens Notebook options, and its accessible name is Notebook options for followed by the notebook name. The same menu also lists Handwriting search in OneNote.
- Under Automatically include new pages, select On. If you only want future pages, use this menu without checking the whole notebook.
- Confirm the row shows Auto. Expand the notebook to review which existing pages are checked; manually select any older unchecked pages you want to send.
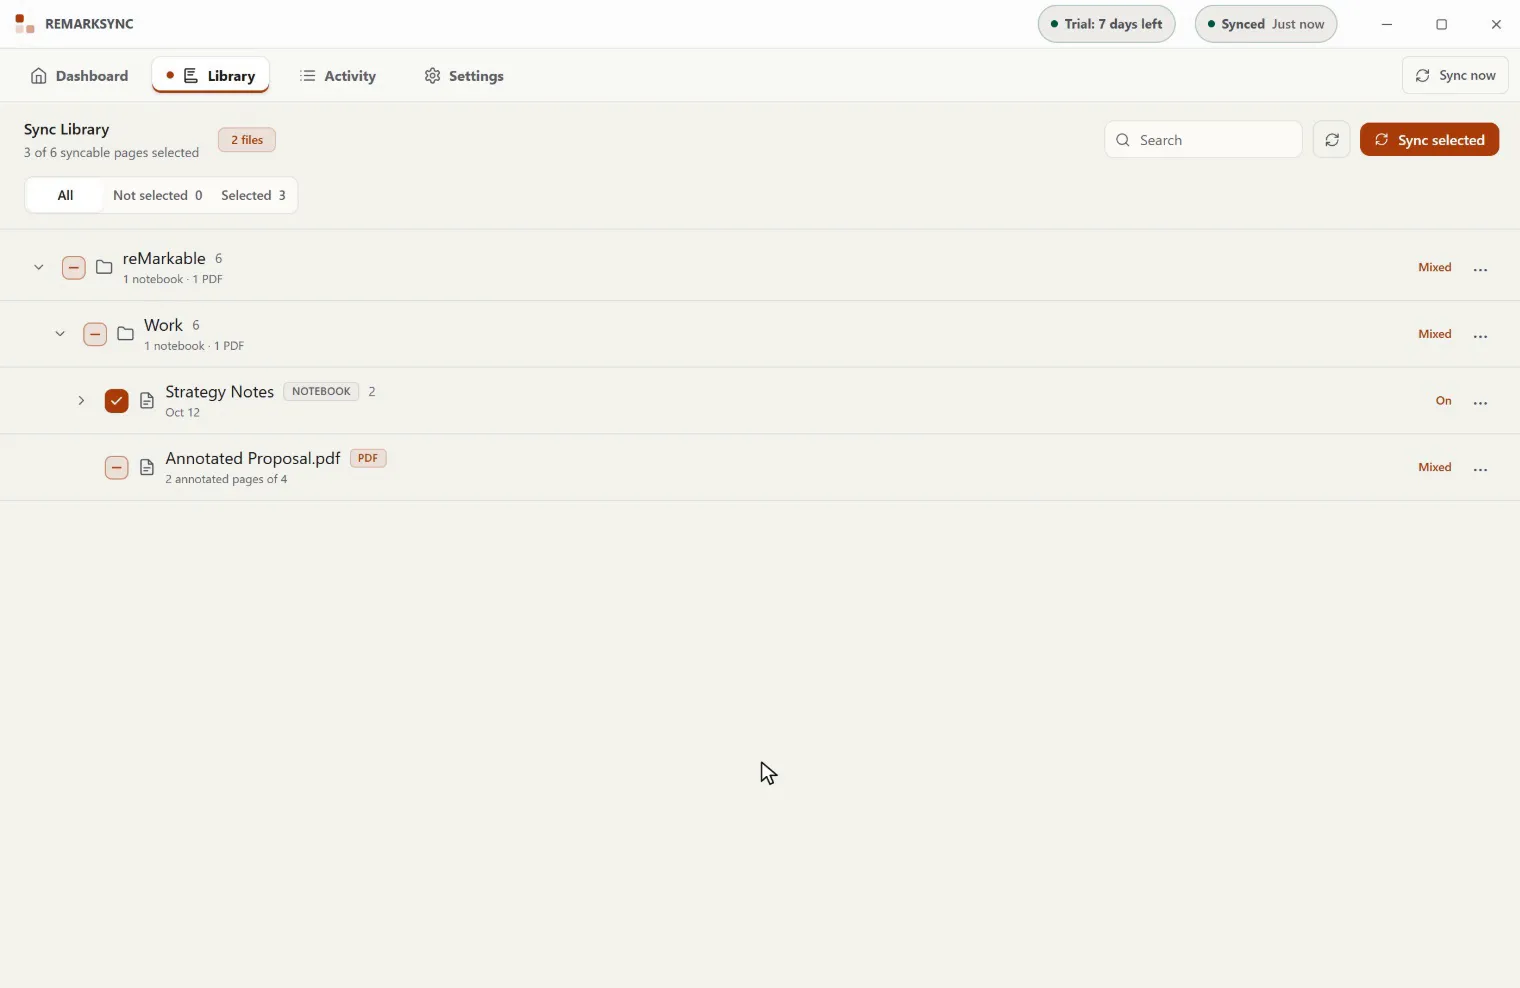
Example: Meeting Notes. You select the Meeting Notes notebook, which contains pages 1 and 2. When a new page 3 reaches the local Library, it becomes selected automatically. ReMarkSync can then sync it when the file, destination, and account are ready. If you later explicitly uncheck a page, Auto leaves it excluded.
Include future notebooks in a folder
Section titled “Include future notebooks in a folder”- Find the folder in Library, or use All notes for the entire Library.
- Open its ··· menu.
- Under Automatically include new notebooks and pages, choose On.
- Review any subfolders and notebooks with their own settings. Select older unchecked content manually if you also want it synced.
Turning this on does not select every existing notebook. A notebook already known to ReMarkSync remains unchecked unless you select it; newly discovered notebooks in the enabled scope can be included automatically. Future pages in already selected notebooks can also be included, unless a more specific rule stops them.
Use inheritance and exceptions
Section titled “Use inheritance and exceptions”ReMarkSync uses the nearest explicit setting: a notebook’s own setting takes priority over its folder, then the nearest parent folder, then All notes. The root default is Off.
| Menu choice or row label | What it means |
|---|---|
| On | Include future eligible items at this scope. More specific settings and explicit exclusions still apply. |
| Off | Stop future automatic inclusion here. Current selections remain, and selected pages can still sync. |
| Use parent setting | Follow the nearest parent’s current rule for future items. Restoring inheritance does not select older unchecked content. |
| Use default setting | The choice at All notes. Its default is Off. |
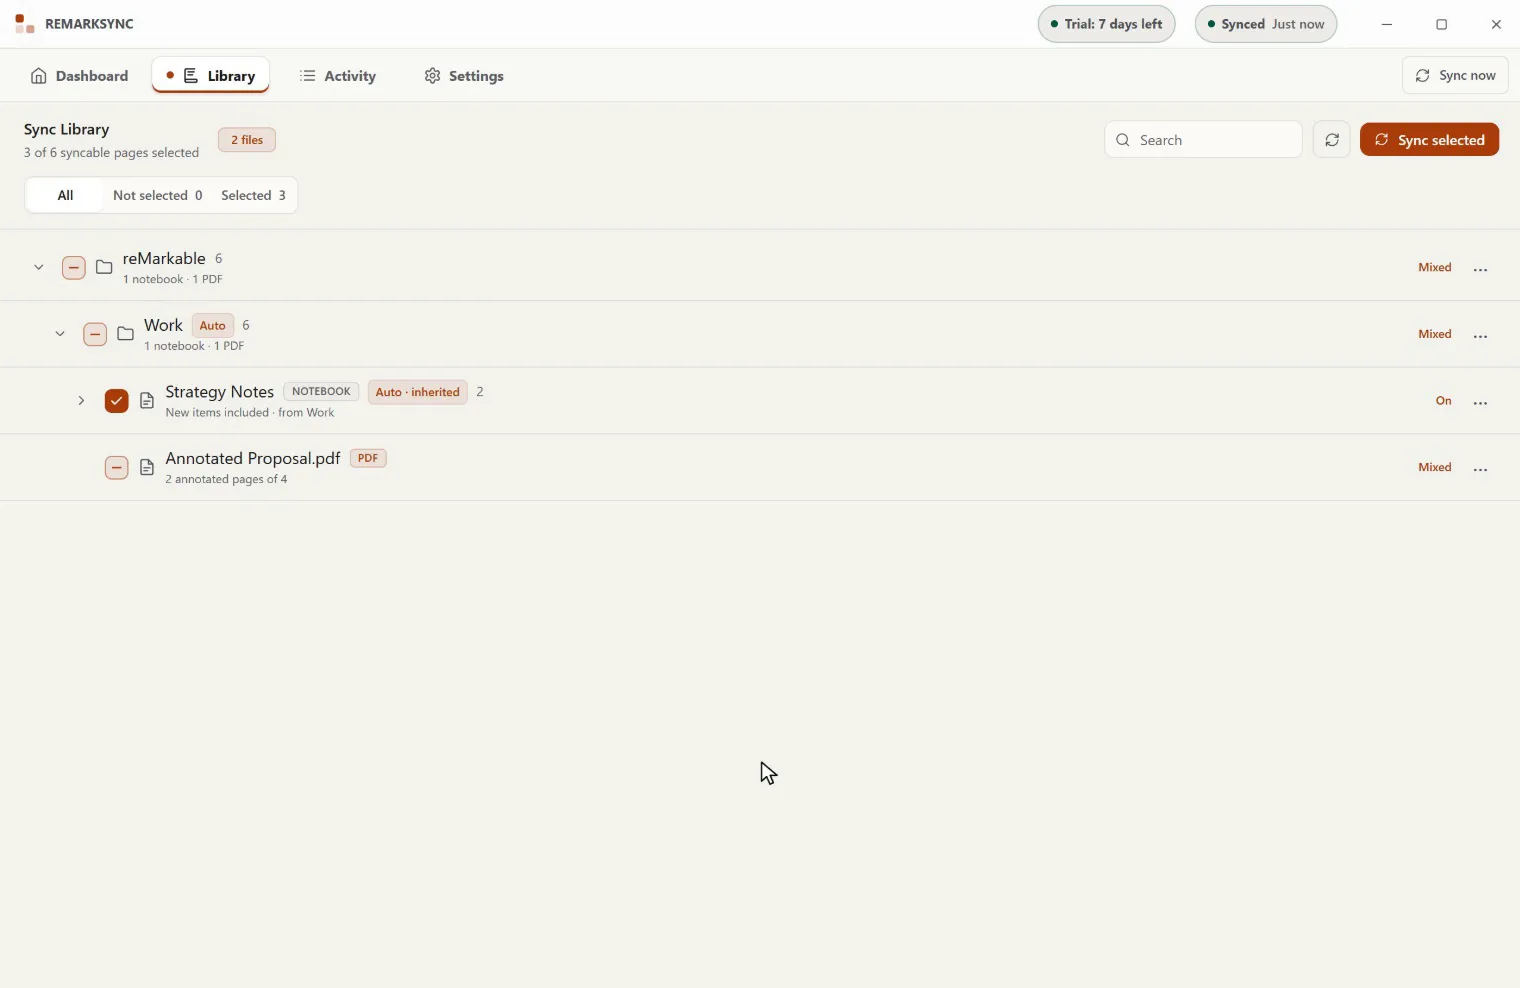
| Auto · inherited | Auto comes from a parent. The row and menu identify the controlling parent. |
| Auto off or Excluded from Auto | This row has an explicit Off setting; Excluded from Auto highlights an Off override beneath an enabled parent. |
Example: Work and Private.
- Set Work to On. New notebooks in Work and its subfolders can be included.
- Set Work / Private to Off. New notebooks in Private stay unchecked.
- Set a particular notebook inside Private to On. Future pages in that notebook can be included because its own rule takes priority. Its older unchecked pages remain unchecked.
- To follow Private again, set that notebook to Use parent setting. Its effective Auto setting becomes Off; its current selections remain.
Stop Auto without removing existing content
Section titled “Stop Auto without removing existing content”- Open the notebook, folder, or All notes row’s ··· menu.
- Choose Off.
- Check that current selections remain as intended. Existing OneNote content is kept; selected pages can still receive updates.
Unchecking a notebook also turns its Auto setting Off. The confirmation says Notebook unchecked · Auto is off. If that was accidental, select Undo in the notification or the short-lived Library notice. Undo restores the previous selection and Auto setting, including inheritance and individual page exclusions. A later selection or policy change can make Undo unavailable; review the notebook if the window has expired.
Example: a page added while Auto was Off. Page 3 arrives in the local Library while Auto is Off. You turn Auto On, then add page 4. Page 4 becomes selected, but page 3 stays unchecked until you select it manually. The same rule applies when you restore Use parent setting: older unchecked content is not backfilled.
Opt in after upgrading
Section titled “Opt in after upgrading”An upgrade from v0.3.1 preserves selections and does not silently add Auto rules. If eligible previously selected notebooks are available, Library shows Keep new pages included.
- Select Review notebooks.
- In Automatically include new pages, review the previously selected notebooks. None is checked by default.
- Check only the notebooks whose future pages you want included.
- Select Enable for 1 notebook, or Enable for … notebooks for the displayed count. This affects future pages only and leaves folder and All notes automation as they are.
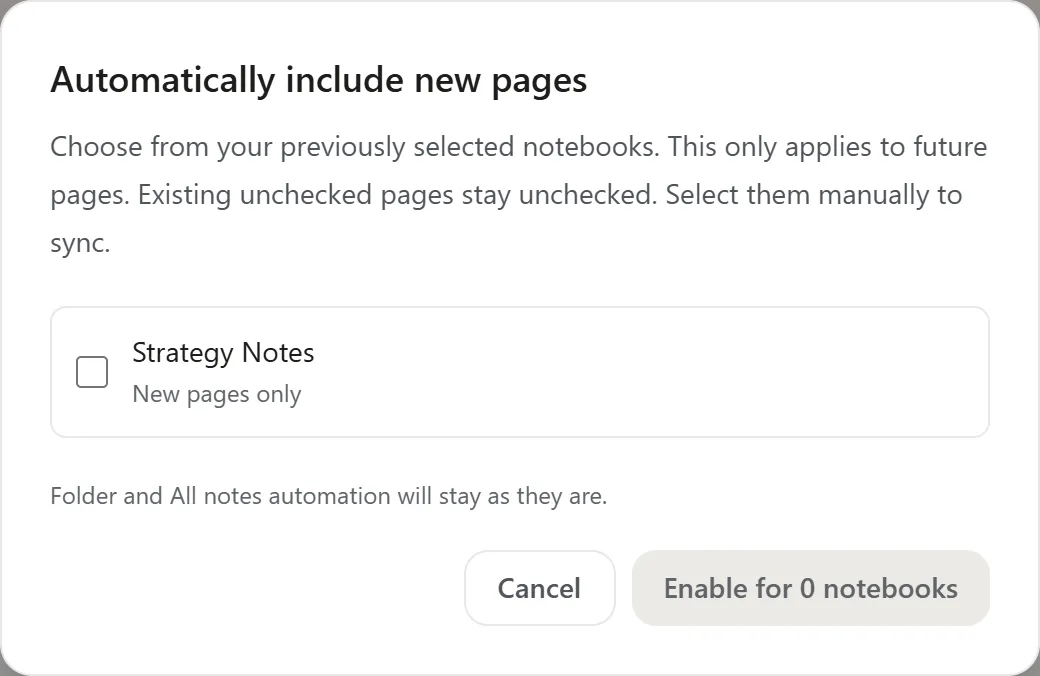
Example: an existing user’s choice. You previously selected Meeting Notes and Personal Journal. In the review, check only Meeting Notes and select Enable for 1 notebook. Both notebooks keep their current page selections. Future Meeting Notes pages can be included; Personal Journal does not gain an Auto rule.
Choose Cancel to close the review and leave the invitation available. Choose Not now on the invitation to dismiss it without enabling Auto. You can always configure notebook, folder, or All notes automation later through their ··· menus; the invitation does not have to remain visible.
Confirm the expected result
Section titled “Confirm the expected result”- Add a new page or notebook in an enabled scope and allow the official reMarkable desktop app to receive it.
- In Library, confirm the new eligible item is checked. If its page file is still downloading, selection can appear before it is ready to sync.
- Open Activity, select History, and look for Auto included. This event confirms that new items were selected for sync. It can summarize several items rather than identify a single OneNote page.
- Select Latest sync to inspect the most recent session, or Open now to check current waiting, retrying, recovering, failed, or attention states.
- Confirm the page’s later completed result and check the content in your chosen OneNote destination.
If a page is Queued, Retrying, Recovering, or needs attention, follow Recovery and retry. Changing Auto does not remove the protection around an uncertain OneNote write.
Common problems
Section titled “Common problems”| What you notice | What to check or do |
|---|---|
| A new item did not appear in Library. | Let the official reMarkable desktop app finish downloading it. Keep the computer and both apps running, then refresh Library. |
| A new page appeared but is unchecked. | Check the notebook’s effective Auto setting and controlling parent. A page discovered while Auto was Off stays unchecked after you turn Auto on. Select that page manually. |
| A new notebook is unchecked. | A folder or All notes checkbox alone does not enable automation. Use its More menu. Also check whether the notebook was already known before Auto was enabled. |
| A particular page stays unchecked under an enabled rule. | An explicit page exclusion stays effective. Select it manually if you now want it sent. |
| A PDF or new PDF annotation was not included. | PDFs remain manual. Select the eligible PDF content in Library; see Choose what syncs. |
| An item was Auto included but has not reached OneNote. | Selection is only the first step. Check for a missing local file, paused access, or a delivery/recovery status in Activity. Use the recovery guide for the matching state. |
| You turned a folder Off but a notebook still includes pages. | Check that notebook and its parent folders for an explicit On override. The nearest setting wins. |
| Automatic inclusion could not be saved appears. | Wait for Library to finish refreshing, reopen the menu to check the retained setting, then try the change again. If it continues, collect the message for support. |
Moving, renaming, and changing the local folder
Section titled “Moving, renaming, and changing the local folder”Moving a known unchecked notebook into an enabled folder does not automatically select it. Moving a selected notebook out keeps its current selection, but future pages follow its new parent unless the notebook has its own rule. Pages already discovered outside an enabled folder are not backfilled when the notebook moves in.
Renaming a notebook or folder keeps its setting because the rule follows the item, not its displayed name. A newly created folder with the same name does not inherit the deleted folder’s rule.
Auto settings belong to the configured local reMarkable library. If you change that data folder in Settings, refresh Library and review its effective settings before relying on automatic inclusion.
Related guides
Section titled “Related guides”- Library: inspect selections and manually sync selected content.
- Choose what syncs: understand checkboxes and eligible pages.
- Activity: inspect selection events and page delivery results.
- Recovery and retry: handle waiting, retries, and uncertain OneNote outcomes.